


Guide to Sharpening Pocket Knives
Learning how to sharpen a pocket knife is mostly about holding a consistent angle and working gradually. You do not need expensive equipment to get a good edge, but a simple whetstone or guided sharpener makes the job much easier.
I think people make knife sharpening sound more mysterious than it really is.
You are basically doing two things:
- Removing enough metal to recreate a clean edge.
- Refining that edge until it cuts smoothly.
The hard part is consistency.
If your angle changes on every stroke, you round the edge instead of sharpening it.
If you keep the angle reasonably consistent and work patiently, you can get a very sharp pocket knife with basic tools.
- RELATED: Best Pocket Knife Sharpeners
QUICK ANSWER
Best all-round method: Whetstone or diamond stone.
Best for beginners: Guided or preset-angle sharpener.
Best finishing tool: Fine ceramic stone or strop.
Typical pocket-knife edge angle: Often around 15-25° per side, but match the existing bevel where possible.
Pocket Knife Sharpening Tools
There are lots of ways to sharpen a pocket knife, and most of them can work.
The important thing is understanding what each tool is good at.
Sharpening Stones
Sharpening stones are still my favourite option if you want to learn proper freehand sharpening.
They can be:
- Water stones
- Oil stones
- Diamond stones
- Ceramic stones
A coarse stone removes metal quickly.
A medium stone restores and refines the bevel.
A fine stone polishes the edge.
Double-sided stones are particularly useful because they give you two stages in one tool.
They work well on pocket knives, fixed blades, small bushcraft knives and most plain-edged outdoor knives.
Guided and Combination Sharpeners
Guided sharpeners are easier for beginners because they help control the angle.
Some use:
- Preset V-shaped slots
- Angle guides
- Clamped systems
- Fixed ceramic or carbide inserts
They are convenient and difficult to use badly.
The downside is that some aggressive pull-through sharpeners can remove more steel than necessary.
I would use them for convenience rather than because they necessarily produce the best possible edge.
Ceramic Sharpeners
Ceramic stones and rods are excellent for refining an edge.
They remove less material than coarse stones and work well when the knife is already reasonably sharp.
I use ceramic more for:
- Touch-ups
- Finishing
- Removing a light burr
They are especially useful when you do not want to completely reset the edge.
Diamond Sharpeners
Diamond plates are excellent because they cut quickly, stay flat and work on very hard steels.
They are also useful in compact pocket-size sharpeners.
A coarse diamond surface can repair a badly dulled blade quickly, while finer diamond plates can refine the edge.
Sharpening Steels
Traditional honing steels are better described as edge-maintenance tools than true sharpeners.
They are excellent for straightening and maintaining a kitchen-knife edge.
For a genuinely dull pocket knife, I would normally use a stone or diamond surface instead.
A fine ceramic rod can do a similar job while also removing a tiny amount of material.
Tapered Rods
Tapered rods are particularly useful for serrated blades because the changing diameter can match different serration sizes.
They can be made from:
- Ceramic
- Diamond-coated steel
- Other abrasive materials
If you regularly carry a serrated multitool or pocket knife, a tapered ceramic or diamond rod is worth owning.
V-Shaped Sharpeners
V-shaped sharpeners use two rods or abrasive surfaces set at fixed angles.
Instead of trying to hold the knife at exactly the right angle, you simply keep the blade vertical and draw it through the V.
They are easy to use and good for quick maintenance.
For more options, see my serrated knife sharpener guide.

How to Sharpen a Pocket Knife with a Sharpening Stone
Freehand sharpening takes a little practice, but the process itself is straightforward.
Step 1: Clean the Blade
Clean the blade before sharpening.
Grease, sap, dirt and food residue can contaminate the stone and make it harder to see what the edge is doing.
Warm soapy water and a cloth are usually enough.
Dry the knife thoroughly afterwards, especially if the blade is carbon steel.
Step 2: Inspect the Edge
Look closely at the cutting edge.
You are checking for:
- Flat shiny sections
- Small chips
- Rolled areas
- Uneven bevels
A completely dull knife needs more work than a blade that simply needs touching up.
If there is serious damage, start with a coarser stone.
If the edge is already in good shape, you may only need a medium or fine abrasive.
Step 3: Match the Existing Bevel
Most pocket knives are sharpened somewhere around 15-25° per side, but there is no single correct angle for every knife.
A thinner angle cuts better.
A thicker angle is generally tougher.
For most sharpening jobs, I simply try to match the bevel already on the knife.
One useful trick is the marker method.
Colour the bevel with a permanent marker and make a few light passes over the stone.
If the marker disappears evenly across the bevel, your angle is about right.
If you only remove marker from the shoulder or very edge, adjust your angle.
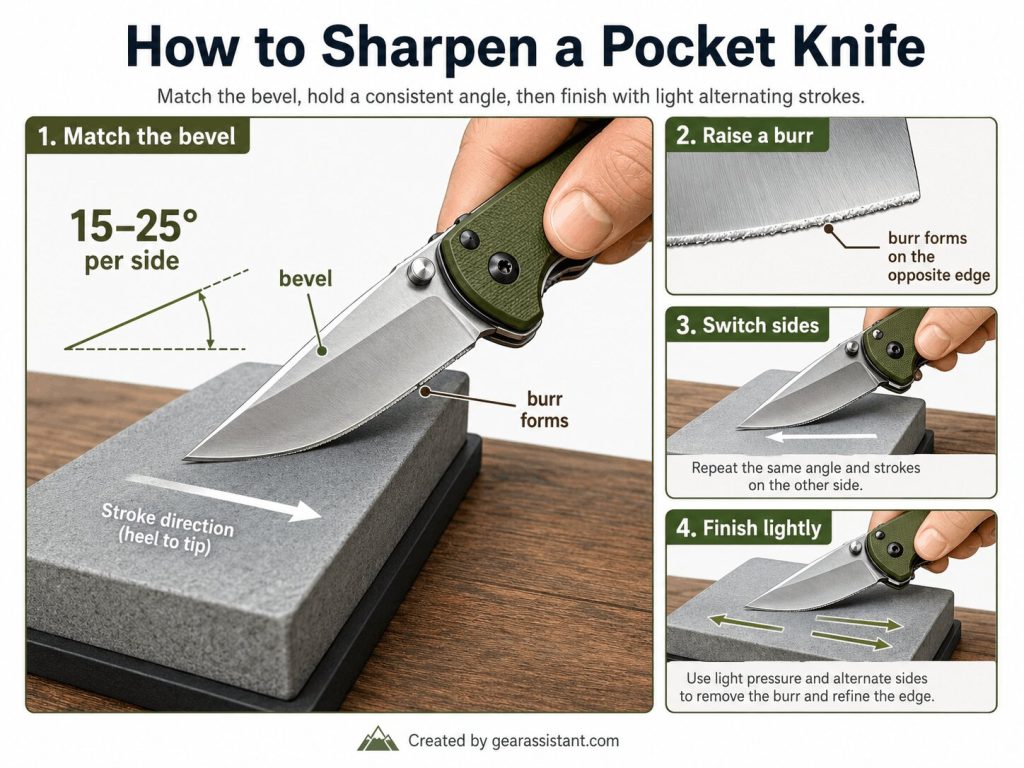
Step 4: Sharpen One Side Until You Raise a Burr
Place the blade on the stone at the correct angle.
Move the edge across the stone as though you are trying to slice a very thin layer off the surface.
Use enough movement to sharpen the whole cutting edge from heel to tip.
Work slowly.
You do not need excessive force.
The goal is to remove metal evenly until a tiny burr forms along the opposite side of the edge.
That burr tells you that you have reached the apex.
Step 5: Sharpen the Other Side
Turn the knife over and repeat the process.
Try to keep your angle and number of strokes broadly consistent.
You want to move the burr back towards the first side.
Once you can feel a burr along the full length of the edge, the basic sharpening work is done.
Step 6: Move to a Finer Grit
Now refine the edge with a finer stone or ceramic surface.
Use lighter pressure.
The goal is no longer to remove lots of steel.
You are smoothing the scratch pattern left by the coarse stone and reducing the burr.
Step 7: Deburr the Edge
A knife can feel sharp while still having a weak wire edge hanging from the apex.
That burr needs removing.
Use alternating light strokes on a fine stone or ceramic rod.
You can then finish on a leather strop if you want a cleaner edge.
Step 8: Test the Sharpness
A sheet of ordinary paper is one of the easiest tests.
A well-sharpened blade should:
- Start cutting without much force
- Slice smoothly
- Avoid snagging repeatedly
I would not test a newly sharpened knife by running your thumb along the edge.
That was poor advice in the old version of this article.
If you want to feel for a burr, move your fingertip very gently across the edge rather than along it, and keep your movement controlled.
What Grit Should You Use to Sharpen a Pocket Knife?
There is no need to start with an extremely coarse stone every time.
I use the least aggressive grit that will fix the problem.
A rough guide:
- 200-600 grit: Repairs chips and very dull edges.
- 800-1200 grit: General sharpening.
- 2000-4000 grit: Refining and polishing.
- Fine ceramic / strop: Final edge cleanup.
Grit systems vary between manufacturers, so those numbers are only approximate.
For most normally dulled pocket knives, a medium stone followed by a finer surface is enough.
Getting a Razor-Sharp Edge
The biggest trick is not buying an ultra-expensive stone.
It is reaching the apex cleanly on both sides.
If you sharpen one bevel beautifully but never actually meet the opposite bevel at the cutting edge, the knife will still feel dull.
The process I use is:
- Match the original angle.
- Sharpen until I raise a burr.
- Repeat on the other side.
- Use progressively lighter pressure.
- Finish with alternating strokes.
- Deburr carefully.
Consistency beats speed.
Should You Use Water or Oil on a Sharpening Stone?
Use whatever the stone manufacturer recommends.
Some stones are designed for water.
Some are designed for oil.
Many diamond plates can be used dry or with water.
Ceramic stones often need very little lubrication.
Do not automatically soak every sharpening stone you own.
Different stones are constructed differently.
If you are unsure, check the manufacturer’s instructions.
How Much Pressure Should You Use?
Less than most beginners think.
Heavy pressure can make it harder to maintain a consistent angle.
I use moderate pressure while setting a dull edge, then gradually lighten up as the edge improves.
The final strokes should be very light.
You are refining the apex, not grinding an axe.
How Often Should You Sharpen a Pocket Knife?
Not after every moderate use.
That was another claim in the original guide that I would change.
Sharpen when the edge actually needs sharpening.
If the knife still cuts cleanly, leave it alone or simply touch it up with ceramic or a strop.
Every full sharpening removes steel.
The less metal you remove while keeping the knife performing well, the longer the blade will last.
Household Items You Can Use to Sharpen a Pocket Knife
If you don’t have a proper sharpener, several household items can work in an emergency.
Unglazed Bottom of a Ceramic Mug
The rough ceramic ring underneath many coffee mugs can work surprisingly well as a sharpening surface.
Use it like a small ceramic stone.
Clean the mug first and make sure it is stable.
Fine Sandpaper
Sandpaper works well if you lay it flat over a hard, smooth surface.
Wet-and-dry abrasive paper is particularly useful.
Do not pinch the blade between folded sandpaper and run it up and down.
That gives you very poor angle control and puts your fingers unnecessarily close to the cutting edge.
Nail File
A nail file can work for a quick emergency touch-up on a small blade.
It is not my first choice, but the abrasive surface can remove enough material to improve a dull edge.
Leather Belt or Cardboard
Leather and cardboard are better for stropping than actual sharpening.
They remove almost no steel.
What they can do is clean up a fine burr and improve an already sharpened edge.
A smooth leather belt can work, but make sure there is no metal buckle or other hardware anywhere near the blade.
How to Sharpen a Serrated Pocket Knife
Do not sharpen a serrated knife by dragging the whole edge over a flat stone.
That can destroy the serration profile.
Instead:
- Identify the beveled side of the serrations.
- Use a tapered ceramic or diamond rod that matches each groove.
- Sharpen each serration individually.
- Use light strokes.
- Remove any burr from the flat side with a very light pass.
The exact technique depends on the serration design.
Some manufacturers use very specific edge profiles.
Using a Rod to Sharpen Your Pocket Knife
Ceramic and diamond rods can be used by keeping either the knife or rod relatively fixed and moving the other against it.
The safest setup is usually the one that gives you the most control.
Some sharpening systems hold rods vertically at preset angles.
You then keep the blade upright and cut down along each rod.
These systems are very beginner-friendly because the angle is already built into the tool.
Can You Sharpen a Pocket Knife with a Kitchen Sharpener?
Yes, provided it is appropriate for the blade.
A kitchen whetstone, ceramic rod or guided system works perfectly well on most plain-edged pocket knives.
I am more cautious with aggressive carbide pull-through sharpeners.
They work quickly, but they can remove a lot of material and may leave a relatively rough edge.
For an inexpensive utility knife that may not matter.
For a good pocket knife, I would rather use a stone or controlled guided system.
Can You Use Sandpaper to Sharpen a Pocket Knife?
Yes.
Place the sandpaper on a flat, hard backing surface and use it like a sharpening stone.
You can even work through several grits.
For example:
- 600 grit
- 1000 grit
- 2000 grit
The exact sequence depends on how damaged the edge is.
Again, the important thing is maintaining the angle.
What Is the Best Way to Sharpen a Pocket Knife?
For beginners, I think a guided sharpener is easiest.
For learning a transferable skill and getting excellent results, I prefer a stone.
A decent combination stone gives you enough range to sharpen almost every normal pocket knife.
The technique takes longer to learn, but once you have it you are not dependent on a specific sharpening system.
What’s the Difference Between Honing, Sharpening and Stropping?
These terms often get mixed together.
Sharpening
Sharpening removes metal to recreate the cutting edge.
This is what a whetstone, diamond plate or abrasive system does.
Honing
Honing generally refers to refining or realigning the edge with a fine abrasive or honing rod.
It removes less material than coarse sharpening.
Stropping
Stropping is the finishing stage.
A leather or similar surface removes tiny burr remnants and polishes the apex.
It is useful for maintaining a very fine edge.
Common Pocket Knife Sharpening Mistakes
The mistakes I see most often are:
- Changing the angle constantly.
- Using too much pressure.
- Starting with a stone that is much too coarse.
- Sharpening one small section far more than the rest.
- Failing to remove the burr.
- Testing sharpness by dragging a finger along the edge.
- Sharpening more often than necessary.
The cure for nearly all of them is slowing down.
How Do You Know When Your Pocket Knife Is Sharp Enough?
For a normal outdoor pocket knife, I don’t need a laboratory edge.
I want it to:
- Slice paper cleanly
- Cut cord easily
- Open packaging without tearing
- Cut food cleanly when needed
If it does those things consistently, I stop sharpening.
Continuing to grind away at the edge just because you can make it slightly more polished is often unnecessary.
Final Verdict
The best way to sharpen a pocket knife is to use a stone or guided sharpening system, match the existing bevel and work until you create a clean apex on both sides.
For most knives:
- Clean the blade.
- Inspect the edge.
- Match the bevel.
- Sharpen until a burr forms.
- Repeat on the opposite side.
- Refine with a finer abrasive.
- Deburr and test.
You do not need to obsess over an exact 22-degree angle.
You do not need to sharpen after every outing.
And you definitely do not need to run your thumb along a freshly sharpened blade to see whether it worked.
Learn to hold a consistent angle and sharpen only when the knife needs it.
That will get you most of the way there.
I hope this updated guide makes sharpening your pocket knife simpler and gives you a technique you can use on almost any plain-edged folding knife.







[…] aggressive and so it only takes 3 – 4 strokes of the blade to set the edge. You can see our guide on sharpening pocket knives here for more information on […]
[…] you start to sharpen your blade it is a good idea to study this diagram of a serrated knife so that you understand which sides need […]
[…] sharpening a pocket knife, the technique is to focus your attention on every single serration of your blade and work your way […]