Last Updated on 27/08/2023

Alpkit Polestar Tent Review
In this Alpkit Polestar Tent review, I test how it performs in wet, windy, and sunny conditions. If you are looking for a tent that weighs under 1 kg, that uses hiking poles instead of tent poles, and doesn’t cost a fortune then look no further.
This tent was ordered by accident but after speaking with Alpkit’s amazing customer service team they let me keep it to review and compare with the Soloist which I had already bought – Read the Alpkit Soloist review here.
Why I wanted to keep the Alpkit Polestar Tent
I am walking a 200-mile thru-hike in a few weeks and want to save as much weight in my pack as possible. Because I have started using trekking poles for long-distance hikes, a tent that uses hiking poles instead of traditional tent poles makes the most sense. There are lots of tent options out there that can do this but most of them cost hundreds of dollars for the sub 1kg range. The Alpkit Polestar ticks all the boxes in terms of design, weight, pack size, and price tag.

First Thoughts
Initial thoughts for this Alpkit Polestar Tent Review are that this tent’s pack size and weight are incredible and just what you need with limited backpack space and weight capacity.
The first time I set it up, I had a few issues getting the material taut, but I managed to get it fairly tight with a little readjustment. I have since discovered how to improve on this with a little trick but more on this further down the page.
It is super easy to set up and once you have done it once you can leave the inner attached to the outer to set it up in one go. The hiking pole slots fit snugly over your handle and the loops at the top feel super tough. The X-style crossover of your hiking poles gives the tent wall incredible strength so that you can pitch it facing into the wind.
Inside there is lots of legroom for tall people and enough headroom to just about sit up. You have vestibule space for your backpack in the door entranceway and space for your boots at the hiking pole end.
Overall I was very happy with the tent and left it up for 3 nights to see how it handled wind and rain which it did very well.
Before we get into the Alpkit Polestar review, let’s have a look at the specifications and features.
Specifications
- Total Weight (excluding footprint): 980 g
- Footprint (optional): 150 g
- Pitched Size: 210 cm x 140 cm x 100 cm (length x width x height)
- Internal Space: 200 cm x 80 cm x 90 cm (length x width x height)
- Packed Size: 42 cm x 11 cm
- Flysheet: 20d Polyester R/S Sil/PU 3,000 mm HH
- Mesh: D33 Mesh
- Inner: 20d Nylon R/S breathable
- Groundsheet: 20d R/s Polyester PU 5,000 mm HH
- Pole: 7001 alloy
- Pegs: 8 x Alloy Y beam pegs
- Zips: YKK size 5 zips
- Footprint (optional): 20d R/s Polyester PU 5,000 mm HH
Features
- Trekking pole construction saves weight
- Crossed pole design for strength
- Pitch inner and outer together (optional)
- Durable fixings
- Compatible with all adjustable length trekking poles and 120cm fixed lengths
- Dual seam roof improves headroom
- Side entry is easier to get in and out of with a spacious porch area
- Can be pitched outer-only for fast and light adventures
- 3 internal storage pockets
- Mesh door and vent at the foot box and entrance to reduce condensation
- 3 Year Alpine Bond

Performance
Features and specs are one thing but the most important aspect of this review is how well the tent performed. Having tested this tent in wind rain, rain, and heat I feel like I can give a very honest review. But first, how did I solve the flappy side panel?
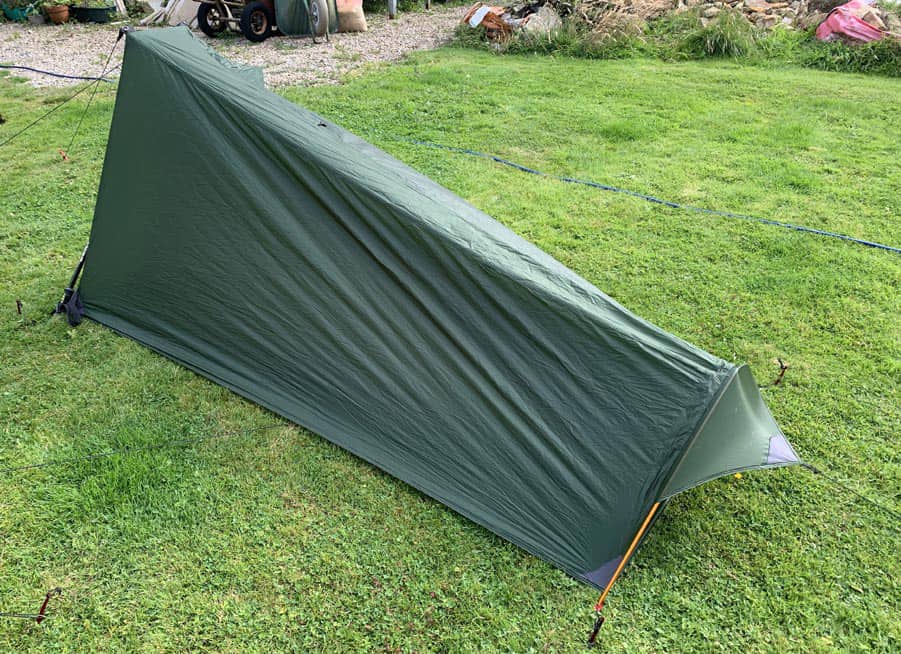
So, as you can see from the picture below, the side panels are mostly unsupported and can be a little flappy in the wind if you don’t get the setup just right. I tested a couple of different methods to try and improve this but found two that worked really well. I first tried using a long tent peg with a glove over the top to protect the outer fabric which made a big difference and pretty much solved the problem. I then ordered a plastic tent clip to see if that was even better but the peg and glove method was actually just as good and a little kinder to the tent fabric.

So, with this minor adjustment, how did the tent perform in the rain? The Alpkit Polestar performed very well in the rain and I stayed completely dry all night. There was one drip when I sat up in the morning which was most likely from condensation and not the rain. The seams are all fully sealed and with the optional tent footprint I felt very dry inside even on the soggy ground I pitched on.
The wind never got too strong but I was surprised at just how well the tent performed in the wind. I was expecting the sides to blow in and touch the inner tent but with the minor adjustment, I made this didn’t happen. You can pitch the outer at ground level to stop the wind from getting underneath but I prefer to leave a small gap to increase ventilation. The pegs that are included are incredibly lightweight and don’t have a hook but the notch was sufficient and there is a small attachment loop you can use if you want.
Having tested this tent in hot weather I have to say that it does get very hot inside with the door closed. I slept with the door open on hot nights and enjoyed a light breeze with a view of the night sky and loved it. In full sun I did feel quite hot in the tent even with the door open but who wants to be stuck inside a tent when the sun’s out anyway?

Comfort
The inner tent is actually very spacious lengthways and there is more than enough space across the width as well as the storage space outside. The headspace isn’t amazing but it also isn’t terrible. The double-seamed roof does help by creating more of a box shape at the top but I am just a bit too tall to comfortably sit up inside on top of my airbed. This isn’t a deal-breaker it is just something to consider.
Even with the wind howling and the rain hammering the outer shell, I always felt toastie warm and comfortable inside. Being able to keep my bag just in the entrance was very handy for getting to my clothes and food from my bed.
Durability
I can’t speak of the durability too much because I am quite precious of my gear and so rarely push the fabric beyond what I think it is capable of. I use the groundsheet for an extra layer of protection underneath which can also help with condensation rising from the ground. The material is very thin and lightweight which is one of the selling points and not a disadvantage
Even without the optional groundsheet, the basin of the inner tent has a 5,000 mm HH rating which is more than enough to sleep on soaking the ground. It was pit through some adversity in windy conditions as well as rain and it had no issues to report on so long as you set it up tightly to start with.
There is some debate on whether the small tent pole at the footwell should be fed through the tight sleeve inside the outer shell or used externally without a sleeve and provide support through the tension of the guy line. Because the internal sleeve is s tight and the material is so thin, I would personally recommend setting it up on the outside which is actually easier and just as supportive.

Construction Time
This tent is super fast to pitch, especially if you already have your hiking poles out and adjusted to the right length. I start by pegging in the foot end of the tent to stop it from blowing off in the wind if I lose my grip. Then I insert the hiking poles in a criss-cross and the pole at the foot end. Now I go around and peg in all the corners and pull out the guy lines at a reasonable tension. Once everything is looking good, I then readjust any of the tent pegs that aren’t tight enough and increase the tension on the guy lines to its maximum. This all takes about 3-5 minutes.
When you first get the tent the inner and outer shell will not be attached so you have to pitch the outer first. You then clip in the internal tent and adjust the tension to where you like it and then from that point you can leave them attached for faster pitching.
Portability
The weight and pack size are two of the main reasons you might be looking at getting this tent. At under 1 kg and a pack size of a small melon, you can fit this in any backpack with ease and without feeling weighed down. You do need to take your hiking poles but they will be used throughout the day anyway so it is just about making the most of the gear you have.
Conclusion
The Alpkit Polestar is a great little tent that is far more comfortable than a bivvy bag or tarp shelter and is perfect for multiday hikes. It is super lightweight and packable which is great for long-distance hikers and backpackers. I would recommend this tent to anyone who uses hiking poles as it saves you packing any tent poles which add weight and are not the easiest to pack. Overall, I would like to see one extra peg loop in the middle of the sidewall but apart from that I really like this tent. You can view more details and buy the tent here.
Thanks for reading my Alpkit Polestar Tent Review, stay tuned for more Alpkit product reviews including the Soloist and Dumo sleeping pad.


[…] just tested the Alpkit Polestar, I was very happy to find that both the inner tent and outer shell remain very taught once the […]